Posts Tagged ‘Recipe’

Dec
04


I’ve made a traditional chocolate pudding before (see link here) but lately I’ve been noticing a lot of non traditional recipes. For example, puddings that are vegan and involve an avocado!!

Please keep reading…LOL .

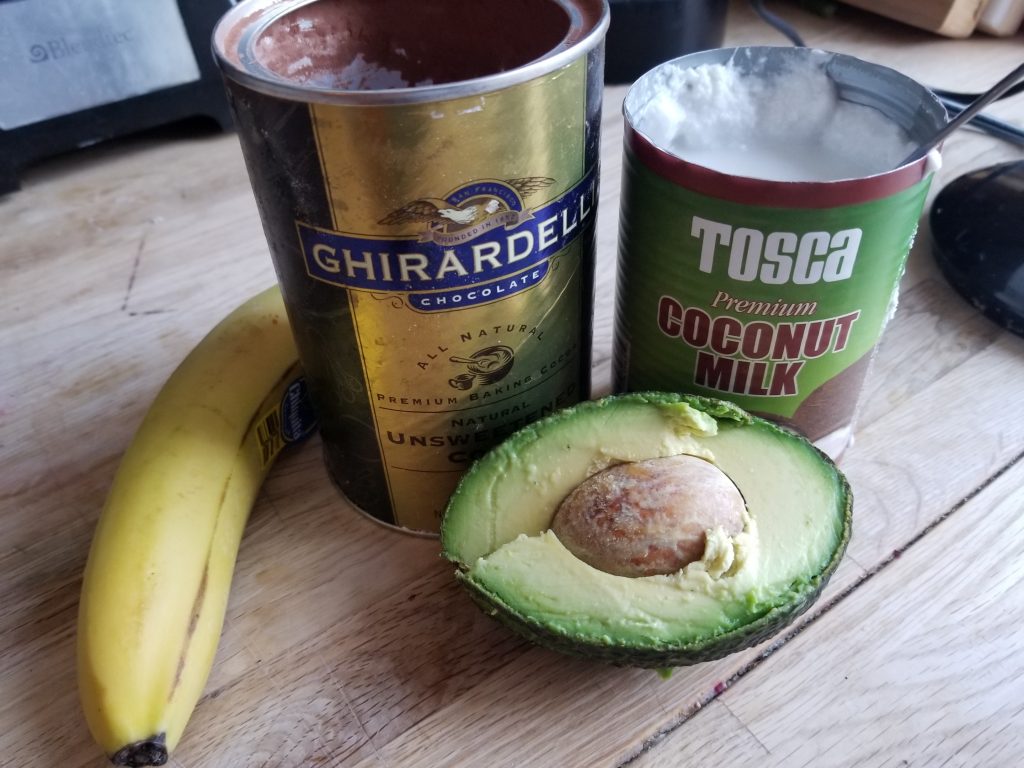
The best part of this recipe is that it involves FOUR ingredients and requires no cooking. Seriously it could not get easier.  The first time I made it, I didn’t measure anything (typical Vicky move) but the second time around I took the time to measure the ingredients so I could blog about it (hooray).

So here’s what you need:

Chocolate Avocado Pudding (original recipe by momwhoruns however very much inspired by recipes seen on Pinterest).

1 Avocado

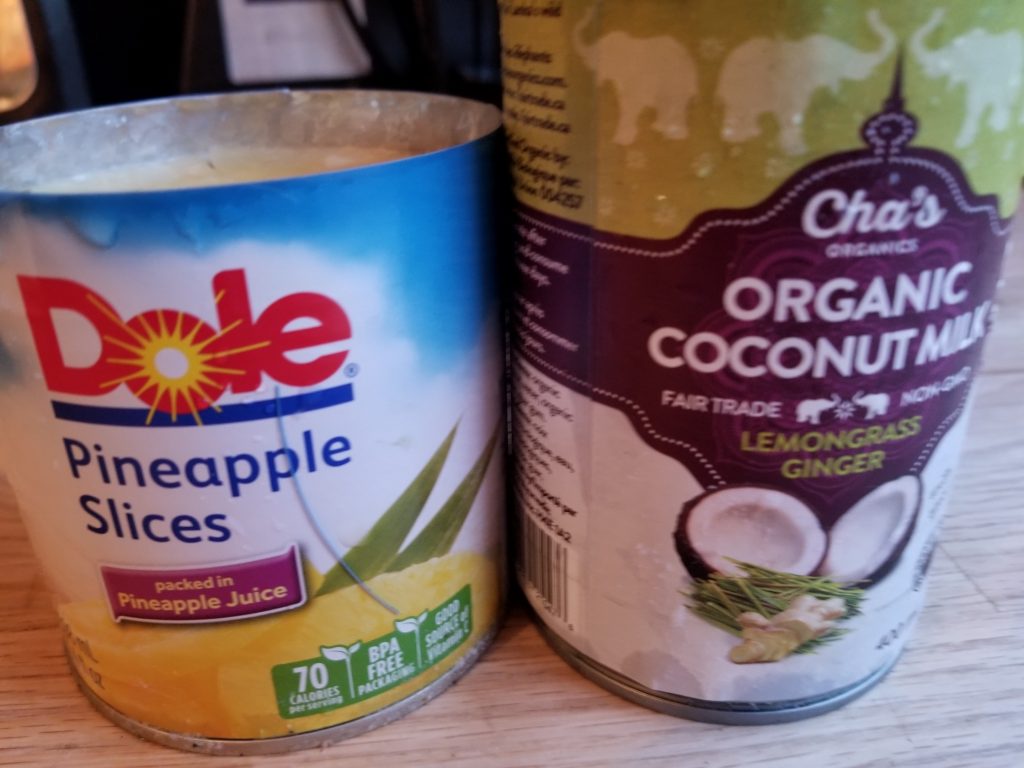
1/3 cup of coconut milk

3 tablespoons cocoa powder

1/4 of a banana

Directions

  1. Please all ingredients in a blender and blend till smooth. (serves 3).  Thats all you need to do!!

I must admit that I was excited to try this recipe so I could bring out my new Braun MultiQuick 9 Hand Blender. The beauty of this appliance is that it can do everything – blend, chop, whip, and more.

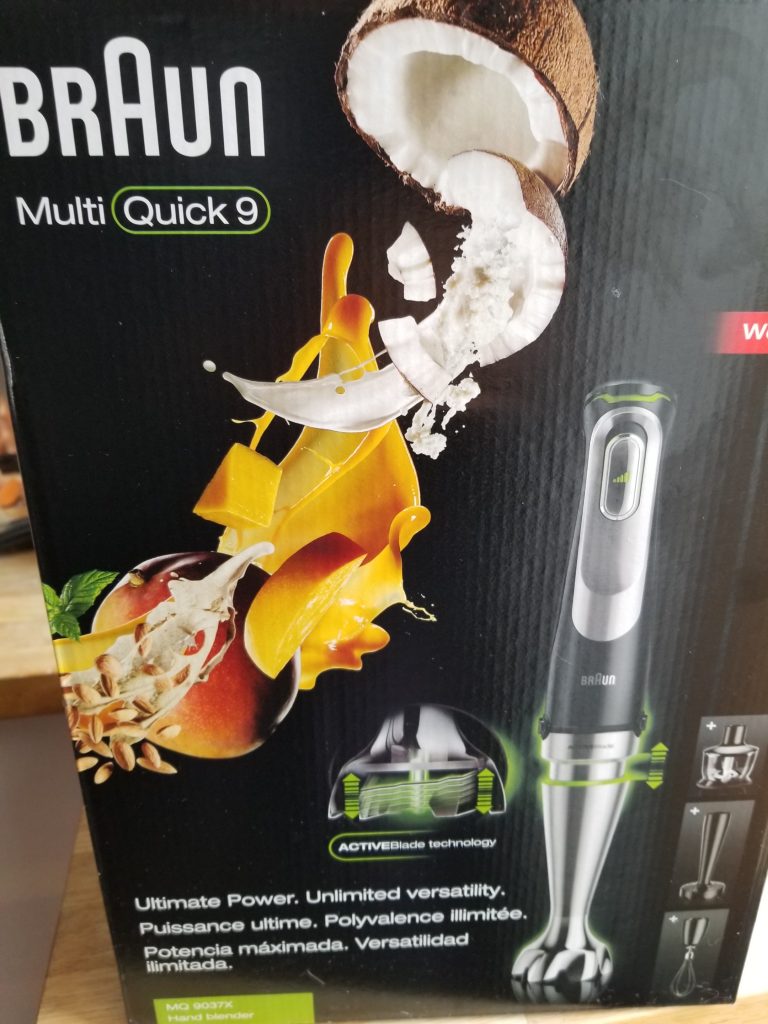
I simply clicked on the attachment that I needed and before I knew it my chocolate pudding was lovely and smooth.

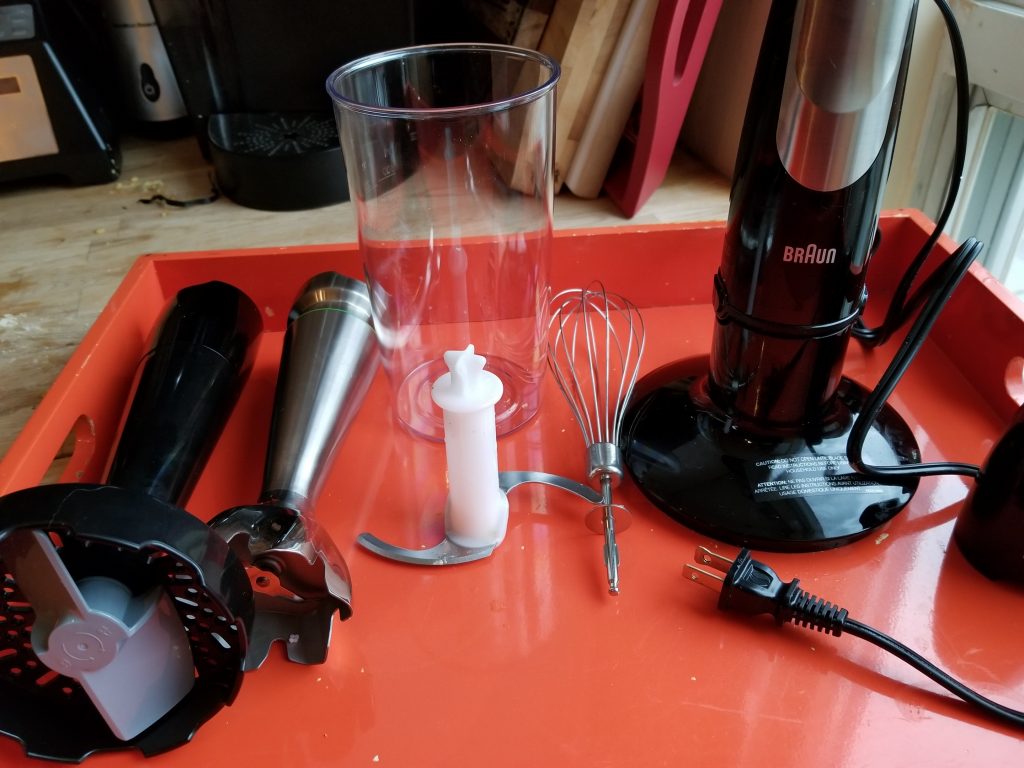
See what I mean? Just 4 ingredients went into the bowl and then the blender attachment did all the work in no time at all.

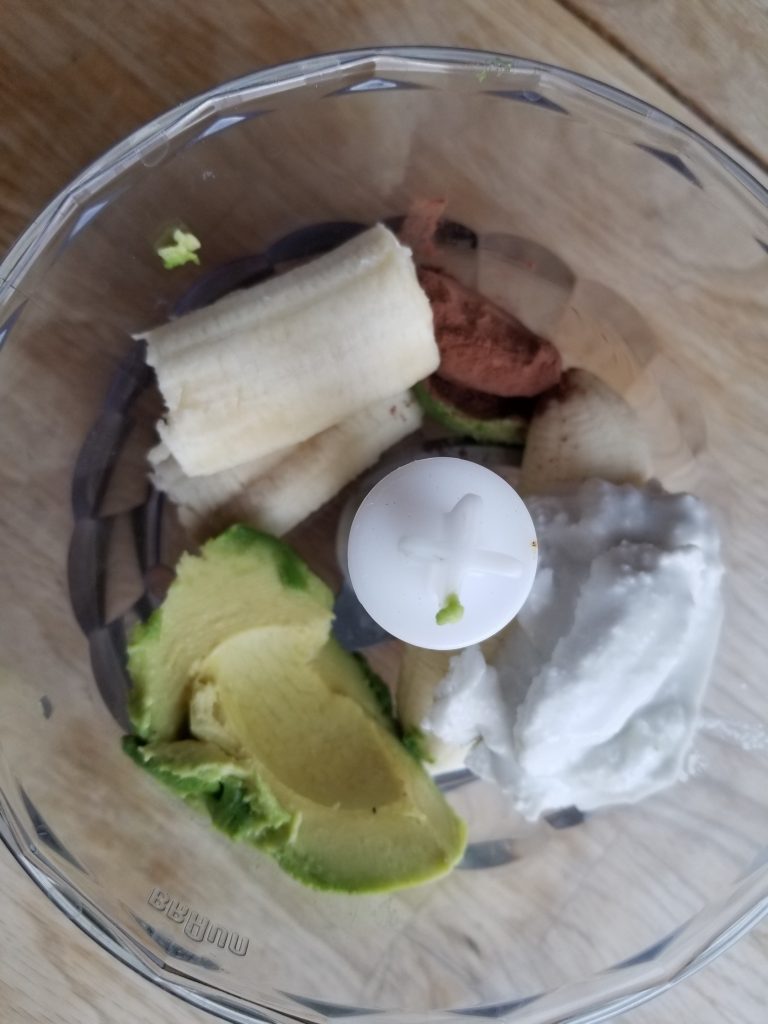
My avocado chocolate pudding was smooth, creamy and HEALTHY too. #score

For more information about Braun products, please click here. (note: there’s a 20 percent discount and free shipping)

Disclosure: I was provided a Braun MultiQuick 9 Hand Blender, however all opinions are my own

Share this:
Share this page via Email Share this page via Stumble Upon Share this page via Digg this Share this page via Facebook Share this page via Twitter

, , , , , , , , , ,

Oct
31

The Edgy Veg


A few weeks ago I attended a very cool event for the launch of a vegan cookbook called The Edgy Veg.

It was a blind taste test where we were able to taste the items being served, guess the flavours, and also guess what we were eating. It was tons of fun. I was casually late (for a change) and the only seat available was next to the cookbook author, YouTube personality, chef and comedian, Candice Hutchings. #squeal.

At the end of the lunch, we all received a signed cookbook which I flipped through on the street car. I then decided that I was going to overcome my “fear of Seitan” and attempt the recipe.

The next day I found myself at Bulk Barn and bought the necessary ingredients: 100% Vital Wheat Gluten, nutritional yeast, poultry season, onion powder and tahini.

I was pumped but nervous at the same time. In fact I was so nervous that I tried TWO recipes …”chicken breast” and “chicken burgers”.

Here’s how to Become a Master of Seitan: Chicken (which is so versatile and can be used to make so many different “meat” like recipes.) Thanks to the Edgy Veg, I’m now a master a seitan due to this recipe.

Ingredients: 

1 cup plus 1 tablespoon vital wheat gluten (divided)

1/2 tsp sea salt

2 tablespoons of nutritional yeast

1 teaspoon onion powder

1/2 teaspoon poultry season

3/4 vegetable broth

1/4 cup tahini

Directions:

In a large bowl combine 1 cup of wheat gluten, sea salt, nutritional yeast, onion powder and poultry seasoning. Whisk to combine. (easy non?)

2. In another large bowl, combine vegetable broth and tahini, whisk until smooth.

3. Using a spatula carefully fold wheat gluten mixture into the vegetable broth mixture until combined (tip: use your hands)

4. Sprinkle work surface with a tablespoon of vital wheat gluten and knead the dough until it is elastic but not too dry.

I then took half of the dough and made “chicken burgers” – I put them into a covered ovenproof dish (um..my beautiful Le Creuset)  and then half-way covered them in more vegetable broth. Bake for 30 minutes (and flip them after 15 minutes).

Crazy delicious results.

I took the other half and made a “chicken breast” shape and then twisted it in tin foil. I baked it for 30 minutes. More deliciousness.

Happy Vegan Cooking!!

For more information:

Facebook: https://www.facebook.com/theedgyveg/

Twitter and Instagram: @edgyveg

Website: www.theedgyveg.com

To purchase a cookbook, click here

Share this:
Share this page via Email Share this page via Stumble Upon Share this page via Digg this Share this page via Facebook Share this page via Twitter

, , , , , , ,

Oct
17


Lately I’ve been entertaining a lot which is code for “I’ve been spending time on Pinterest”.

As always Pinterest inspired me to put together the following menu:

-Carrot Soup

Spinach Feta Pinwheels

-Pineapple Coconut Quinoa

-Roasted Mushrooms in Browned Butter

Baked Tilapia Veracruz

-Pear/Apple Crisp

I was also inspired to set the table using some placemats I hadn’t used in a while!

In particular I want to share the Pineapple Coconut Quinoa recipe with you. It was SO flavourful and not hard to make at all.

The flavour was due to these two ingredients: Dole Pineapple Juice and Cha’s Organic Coconut Milk

Hurry up and make this fabulous side dish – you won’t be disappointed. Promise.

Recipe: Pineapple Coconut Quinoa (original recipe posted by www.theharvestkitchen.com)

INGREDIENTS:

  • 1 cup coconut milk
  • 1 cup unsweetened pineapple juice  (I used a can of pineapple and drained the juice from it).
  • 1 cup quinoa, rinsed
  • 1/2 teaspoon pure vanilla extract
  • juice of 1/2 lime
FOR THE MANGO SALSA
  • 1 cup chopped mango
  • 1/4 cup cilantro, chopped
  • 1/4 cup red onion, minced
  • 2 limes, juiced

DIRECTIONS:

  1. This is the interesting part – heat the pineapple juice and coconut milk in a saucepan over medium low heat.
  2. Then add the quinoa and bring to a boil.  Reduce heat to low.  Add the vanilla and lime juice.
  3. Cover and simmer on low for about 17 to 20 minutes or until most of the liquid has absorbed, but still a little moist on top.
  4. Remove from heat and set aside.
  5. Lightly fluff with a fork. (an important step)
  6. Add chopped mangoes, coriander and red onion. Feel free to add a touch of lime juice as well.

Final Result:

Not only did it taste amazing but I was happy the way it looked as well!!

Share this:
Share this page via Email Share this page via Stumble Upon Share this page via Digg this Share this page via Facebook Share this page via Twitter

, , , , ,

Oct
15


The first thing that comes to my mind when you say “September” or “October” is APPLES. It’s funny, I didn’t grow up apple picking but as soon as I had kids it was something we did almost every single year.

Sadly I can’t get the kids (now 17 and 21) to go anymore, but that doesn’t stop me from heading out to Milton to go apple picking!!

So a few weeks ago, my boyfriend and I headed out on a beautiful Sunday and went to Chudleigh’s.

We timed our visit right and went around 2 pm which meant that it was nap time and missed the morning “rush” of families. (#smartmove)

I managed to accomplish everything on my visit.

a) I simply HAD to have the corn on the cob.

b) I simply HAD to go on a wagon ride. Yes – I’m 52 years old and still feel like a 10 year old sometimes. LOL

c) We filled up a bag of apples and then went home to make a delicious dessert that I discovered on Tip Hero. Promise to share this recipe with you in more detail in a future blog post. PROMISE.

Seeing as we went early in the season, there were only two varieties available. However this DID NOT stop us from enjoying our experience.

There’s plenty of apple varieties (throughout the season) to keep everyone happy.

We are still enjoying a warm Fall so don’t hesitate to consider a trip to Chudleigh’s. Here’s proof.


Happy Apple Picking!

PS Chudleigh’s is open till Oct 31st!

For more information:

Website: www.Chudleighs.com

Address: 9528 Regional Road 25
Halton Hills, ON L9T 2X7

Twitter/Instagram: @chudleighsfarm

Facebook: https://www.facebook.com/chudleighs/

Disclosure: I was provided with complimentary passes, however all opinions are my own

Share this:
Share this page via Email Share this page via Stumble Upon Share this page via Digg this Share this page via Facebook Share this page via Twitter

, , , , ,

Aug
20


Summer is almost over which is really really sad. However this recipe is going to make you smile. It’s super easy to make (3 ingredients) and it’s perfect for an after school snack!! (which is right around the corner for many of us)

However, you will need a lot of time. About 10 minutes to actually make the recipe and 5-6 hours to sit in your oven. You have now been officially warned!!

I hope you continue reading…..

As always, there’s a story behind this recipe! I happen to have gone raspberry picking and then realized that I was too lazy to bake and had no room to store them in the freezer.

I headed over to Pinterest and entered the word “raspberries” into the search engine. A whole bunch of ideas came up but one in particular got my attention that was featured on a blog called www.liveeatlearn.com.

I wish there were more photos but I honestly didn’t think it was going to turn out so I didn’t take any photos while making it. #lessonlearned #bepositive.

3 Ingredient Fruit Leather Roll up (original recipe can be found here).

Ingredients:

  • 3 cups fruit (try raspberries, try this with mango, try it with blueberries…)
  • 2-3 Tbsp honey can sub sugar or sugar-substitute
  • 2 Tbsp lemon juice (I didn’t have any and it still worked out)

INSTRUCTIONS

  1. Blend fruit in a fruit processor. Mix in sweetener and lemon juice. (simple eh?). It shouldn’t be too thick or too thin.
  2. Line a cookie sheet with plastic wrap (a good quality one).
  3. Pour the pureed mixture into the pan lined with plastic wrap then spread out ⅛ to ¼ inch thick
  4. In oven at 140 to 170 degrees F (60 to 75 degrees C, or as low as oven will go) for 5 to 6 hours, or until middle is not longer tacky.
  5. Allow to cool, then remove from plastic wrap.
  6. Use clean scissors, cut into 1 inch wide strips.
  7. Wrap with strips of parchment or tissue paper, then use tape or string to seal. (I didn’t do this step as it was so good that we ate all of it right away)
 Final Result: Pretty Cool eh?
 
I can’t wait to try this with the strawberries that are sitting in my freezer.

Happy Baking!!

Share this:
Share this page via Email Share this page via Stumble Upon Share this page via Digg this Share this page via Facebook Share this page via Twitter

, , , , ,

Apr
13


I’ve been busy in the kitchen lately which is code for “I have some recipes to share with you”.

I must admit, I was nervous when I was making this dish as I wasn’t quite sure it would work out but it did! (hip hip hooray).

This recipe only requires a few ingredients and wasn’t hard to make at all. My biggest tip to share with you is to invest in a cheesecloth (available at any dollar store) to ensure that your grated potato is DRY!

Wringing out the grated potato in a dish cloth just isn’t the same. Trust me. So here’s what you need to know to make this fabulous side dish.

Recipe: Spinach Potato Nest (original recipe found here www.MayIHaveThatRecipe.com)

4 large Yukon Gold Potatoes
1 tsp salt
¼ – ½ tsp pepper
2½ tsp garlic powder
2½ tsp onion powder (I went to Bulk Barn to grab this ingredient)
4 tsp vegetable oil
Cooking Spray
4 cups of frozen spinach thawed  (I bought 2 packages and it was more than enough)
4 tbs extra virgin olive oil
4 large eggs

Instructions

Preheat oven at 400F
1. Grate the potatoes, add ½ tsp of salt, mix well and let them sit in a colander with a bowl under it for 20 minutes. Squeeze as much water out of the grated potatoes as you can. (I used a cheesecloth and you should too!!)  Season with ½ tsp garlic powder, ½ tsp. onion powder, ½ tsp pepper. Add 4 tsp vegetable oil and mix well.

2. In a large skillet, sauté spinach in olive oil. Season with 2 tsp garlic powder, 2 tsp onion powder and ½ tsp salt. Cook until most of the water had evaporated, 6-8 minutes. Set aside. (Note: I squeezed out the water with my hands just to make sure it was dry)

passover -spinach

3. Generously spray a 12 muffin tin pan with cooking spray.

4. Arrange grated potatoes into each muffin cup, pressing against the bottom and up the sides. (Another Tip: I spent a bit of time, pressing the potatoes down)

passover - nest

5. Bake in the oven for 15 minutes or until they start to brown slightly . Remove from the oven.

Final Product:

passover - spinach final

Happy Cooking!

Share this:
Share this page via Email Share this page via Stumble Upon Share this page via Digg this Share this page via Facebook Share this page via Twitter

, , , ,

Mar
16


Please forgive me as I haven’t been blogging as much as I normally do. You can blame the following recipe which is so simple that I’m making a batch every two days. What’s not to love? All you need is a blender and a few ingredients. I’m also loving the fact that there’s NO FLOUR, NO SUGAR and NO BUTTER in this recipe.

blender - ingredients

This recipe is saving me in the morning as I tend to sleep in till the last possible moment. As a result – there’s always a mad dash out the door WITHOUT eating anything. Now I simply grab a zip lock bag and enjoy these muffins in my car. Can anyone else relate?

I’m not going to keep you waiting much longer for the recipe. Here it is!

Recipe: Blender Oatmeal Muffins (original recipe can be found here – www.wellplated.com)

Ingredients

2 cups oats (quick cooking or old fashioned – I used old fashioned)
2 large ripe bananas
2 large eggs
1 cup plain Greek yogurt
2 to 3 tablespoons honey
1 1/2 teaspoons baking powder
1/2 teaspoon baking soda
1/2 teaspoon pure vanilla extract

1/2 cups of mix ins – chocolate chips, raisins, nuts, chopped dates – whatever you want!!

Directions:

1. Preheat oven to 400 degrees

2. Mix all ingredients in the blender. (how easy could this get?).

blender - blender

3. Drop batter into a well greased muffin pan. Fill no more than three-quarters of the way to the top. Sprinkle with additional chocolate chips or nuts as desired. Bake for 15 minutes, until the tops of the muffins are set and a toothpick inserted in the center comes out clean. Place the pan on a wire rack and let the muffins cool in the pan for 10 minutes.

FINAL RESULT!!

blender - finalHappy Baking!!

Share this:
Share this page via Email Share this page via Stumble Upon Share this page via Digg this Share this page via Facebook Share this page via Twitter

, , , , , ,

Mar
01


I hosted a dinner party on Saturday night and the menu looked liked this:

-Ginger Tomato Soup with Roasted Chickpea Croutons

-Zucchini Ribbon Salad with Feta Cheese and Nuts

-Roasted Za’atar Cauliflower with Dates, Pine Nuts and Thyme

-Sweet Potato Noodle Salad with Roasted Corn

-Winter Citrus Butter Salmon

All the recipes were found on Pinterest  (does that surprise you?) plus it was the first time I had attempted to make these recipe. Pretty brave move, non? I also brought out my china that was purchased in 1990 but in storage for the last 5 years. I’m determined to start using it again every Friday night.

china 2

Needless to say, I would make each and every recipe again!

This blog post is going to be dedicated to one of the recipes that I made for the dinner party. PS a trip to Bulk Barn with help with you with most of the ingredients. Hope you appreciate that tip!!

RECIPE; Roasted Za’atar Cauliflower with Dates, Pine Nuts and Thyme (original recipe courtesy of www.downshiftology.com)

1 head cauliflower, cut into florets
3 tbsp olive oil
1 tbsp, za’atar spice *I used a few tablespoons.
salt and pepper, to taste
¼ cup pine nuts
1 tsp olive oil
6 Medjool dates, pitted and diced
1 tsp fresh thyme, plus extra sprigs for garnish

INSTRUCTIONS
1. Preheat the oven to 400 degrees fahrenheit.
2. Place the cauliflower florets on a baking sheet and drizzle with 3 tablespoons olive oil. Sprinkle with za’atar spice, salt and pepper and toss.

saturday - roasted cauli
Cook in the oven for 20-25 minutes or until golden brown, and stirring halfway through.

3. While the cauliflower is cooking, heat a small pan on medium heat. Toast the pine nuts in a dry pan for 1-2 minutes, then add 1 tsp olive oil, the chopped dates and thyme. Cook for another minute or two.

saturday - pan -dates


3. Mix the date/pine nut mixture with the cauliflower florets in a serving bowl.

saturday - cauliflower

Trust me, this dish tastes delicious and wasn’t hard to prepare at all.

PS more recipes from this dinner party will be on its way!!

Happy Cooking.


Share this:
Share this page via Email Share this page via Stumble Upon Share this page via Digg this Share this page via Facebook Share this page via Twitter

, , , , ,

Feb
09


I make a batch of banana muffins about twice a month. They are the perfect snack, freeze beautifully and the muffins are a nice addition to a lunch box as well.

Recently I was introduced to the Guiding Stars program which is now available at No Frills, Loblaws and Real Canadian Superstores. Next time you are shopping, look for these signs which indicates a “better choice”.

PC - Guiding Stars

Here are two examples of Star Ingredients:

Egg
★★ White Eggs – Large
★★★ Omega-3 Eggs

Flour
★ White Flour
★★ Whole Wheat Flour
★★★ Whole Spelt Flour

Therefore you could take my amazing banana recipe and make it even healthier just by using an Omega-3 Egg or by adding a high-fibre cereal, flaxseeds, hemp hearts and/or your favourite nut to turn this snack into a healthy breakfast option!

See what I mean? It doesn’t take a lot to make an ordinary recipe a much healthier recipe!! Plus the Guiding Stars program is an easy way for you to accomplish this.

Once again, look out for these blue stars!

pc - two stars

Not to mention, that certain Loblaws stores have In-Store Dieticians to assist you as well!!

Here’s my banana muffin recipe but feel free adapt it with Star Ingredients!

pc - ingredients

Ingredients

2 cups of mashed bananas (about 5) Note: the darker the better
3/4 cup granulated sugar
1 egg (see options below with Star Ingredients)
1/3 cup melted butter
1 tsp baking soda
1 tsp baking powder
1/4 tsp salt
1 1/2 cups all purpose flour (see options below with Star Ingredients)

Star Ingredients

Egg
★★ White Eggs – Large
★★★ Omega-3 Eggs

Flour
★ White Flour
★★ Whole Wheat Flour
★★★ Whole Spelt Flour

Note from In-Store Dietitian, Lauren Baker:
Add Ground Flaxseed
Add Hemp Hearts
Add Cinnamon + Vanilla
Add “crunch” with Bran Flakes or Quick Oats

I really do believe that homemade muffins are a convenient snack for on-the-go routines, and can be lower in saturated fat, sugar, and calories than store bought or fast-food alternatives! For improved portion control, try making mini-muffin and enjoying only one or two with your morning coffee. Its a win-win!!

Happy Baking!

Disclosure: I was compensated for this blog post, however all opinions are my own

Share this:
Share this page via Email Share this page via Stumble Upon Share this page via Digg this Share this page via Facebook Share this page via Twitter

, , , , , , ,

Jan
17


The other night, we entertained which is code for: “try some new recipes”. So I spent some time on Pinterest looking for inspiration and then planned the following menu:

-Edamame Salad

entertaining - edamame

PC® Vegetarian Pot Stickers

entertaiing - potstickers

-Rice Wraps: trust me I will blogging about this one day soon

entertaining - rice wraps

-Sushi platter from Sushi on Bloor

-Avocado Egg Rolls with a sweet chilli sauce (click here for the blog post with the recipe)

entertaining - eggrolls

-General Tso’s Tofu

entertaiing - tofu

I’d like to share the General Tso’s Tofu recipe with you, as it was beyond delicious and easy to make as well. The trick is to squeeze the excess water from the tofu which is something I’ve just started to practice and it makes all the difference.

Plus I’ve never coated tofu in cornstarch before either and I believe this made a difference too.

RECIPE:  GENERAL TSO’S TOFU (original recipe can be found by visiting www.grumpyshoneybunch.com)

1 block extra firm tofu
3-4 Tablespoons cornstarch
1 Tablespoon canola oil

Sauce: (there’s a lot of ingredients but don’t let this scare you)
½ cup brown sugar
3 tbsp hoisin
3 Tablespoons white or rice vinegar
3 Tablespoons ketchup
2 Tablespoons soy sauce
½ cup water
1 tablespoon Sesame oil
4-6 spring green onions, sliced
3 tbsp fresh ginger finely chopped
Hot pepper flakes (optional) ps I didn’t chose to use hot pepper flakes

INSTRUCTIONS
1. Squeeze tofu of excess water! (this is an important step) I did this by placing the tofu between two plates and then placing a heavy object on top of the plate i.e….I used my water jug! Wait 30 minutes or longer.

2. Prepare the sauce: Miix together the first 6 ingredients and set aside.

3. To prepare tofu for frying: Cut into cubes and then coat lightly with cornstarch and fry in a shallow frying pan with canola oil until browned and crispy. Remove from frying pan and set aside.

tofu - fried

4. Wipe pan clean with paper towel and add sesame oil with onions and chopped ginger. Fry about 1 minute, until fragrant.

tofu - ginger

5. Then combine everything….the tofu, the ginger/scallions and the sauce. Stir till all the tofu is coated in the delicious sauce.

Happy Cooking!


Share this:
Share this page via Email Share this page via Stumble Upon Share this page via Digg this Share this page via Facebook Share this page via Twitter

, , , , , , ,