


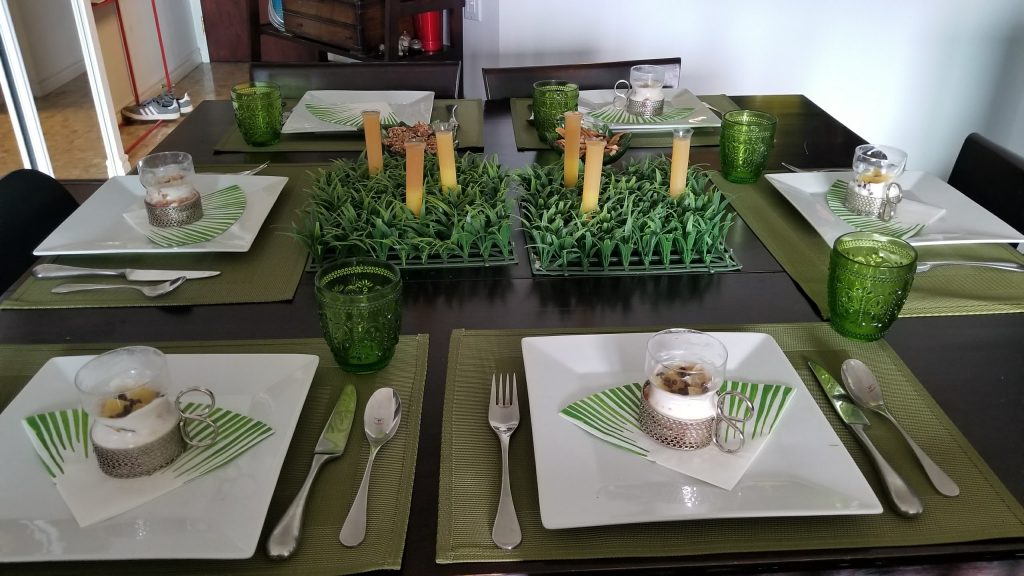
Another Sunday = another opportunity to host a brunch for friends that were visiting form Ottawa. My friend graciously offered to bring bagels and cream cheese but I was eager to try to try out some new recipes that I found on Pinterest. As for the recipes I tested….I scored. They all came out perfect and of course I’m going to share the details with you.
The table looked like this. Don’t you just love the grass runner and those adorable shot glasses (which were perfect to serve mimosas?)
As for the food…. the main attraction was this Easy Overnight Blueberry French Toast Bake from www.thesaltymarshmallow.com. Once again I need to thank Pinterest for helping me find this incredibly easy and tasty recipe!
- 2 French Baguettes cut into 1/2 slices. (I used one long baguette and it was fine)
- 1 12 ounce Package Cream Cheese, softened
- 1/4 Cup Maple Syrup
- 2 Cups Blueberries
- 1/2 Teaspoon Cinnamon
- 2 Eggs
- 1 1/2 Cups Heavy Cream or Milk
- 1/2 Teaspoon Vanilla Extract
- Topping:
- 1/2 Stick Butter
- 1/3 Cup Brown Sugar
- 1/4 Cup Maple Syrup
- 1/2 Teaspoon ground cinnamon
-
Lightly butter a 3 quart casserole dish.
-
In a medium bowl using a hand mixer or large spoon, (I used my Cuisinart and I’m glad I did) to combine the cream cheese with the maple syrup, and cinnamon, then fold in the blueberries. Pretty easy eh?
-
Spread about a tablespoon (or so) of the blueberry cream cheese mixture onto one side of each slice of bread. Place bread slices evenly in a row in the prepared baking dish.
-
In a medium bowl, whisk together the eggs, cream (I used cream) or milk, and vanilla extract. Pour mixture evenly over bread slices.Cover pan with foil and refrigerate at least 3 hours – overnight. (Overnight is best and I agree!)
Preheat oven to 350 degrees.Place the bread mixture in the oven and bake for 35-45 minutes, until golden brown.
Prepare the topping: Melt butter in a small saucepan over medium heat. Whisk in the brown sugar until smooth. Whisk in the maple syrup and cinnamon. Drizzle over french toast as desired. (note: I forgot to do this step and it was still delicious).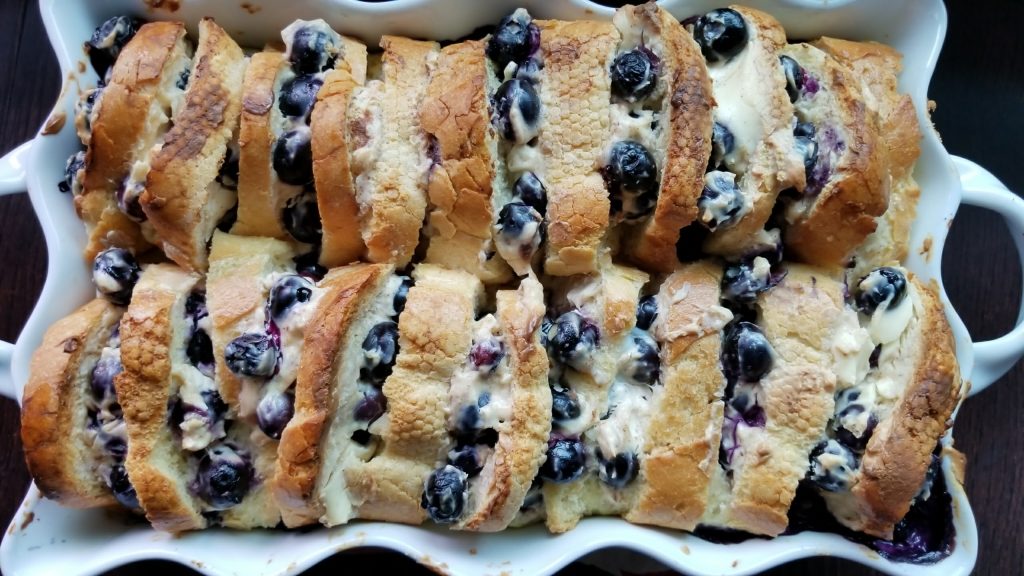
I also served baked eggs in rep pepper shells! For added flavour I put in some vegetarian sausage and chives (for color).
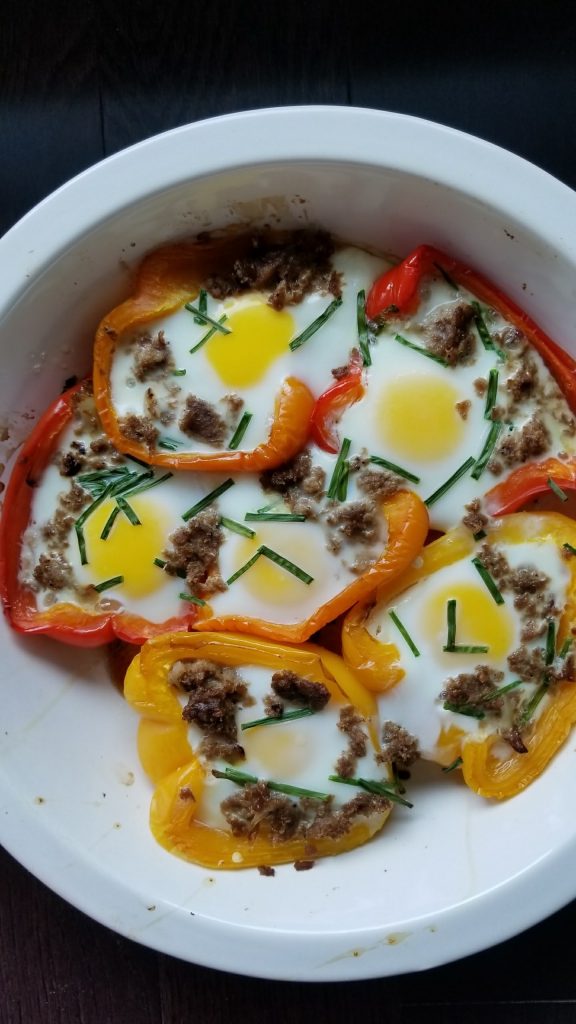
Healthy. Oh so healthy.
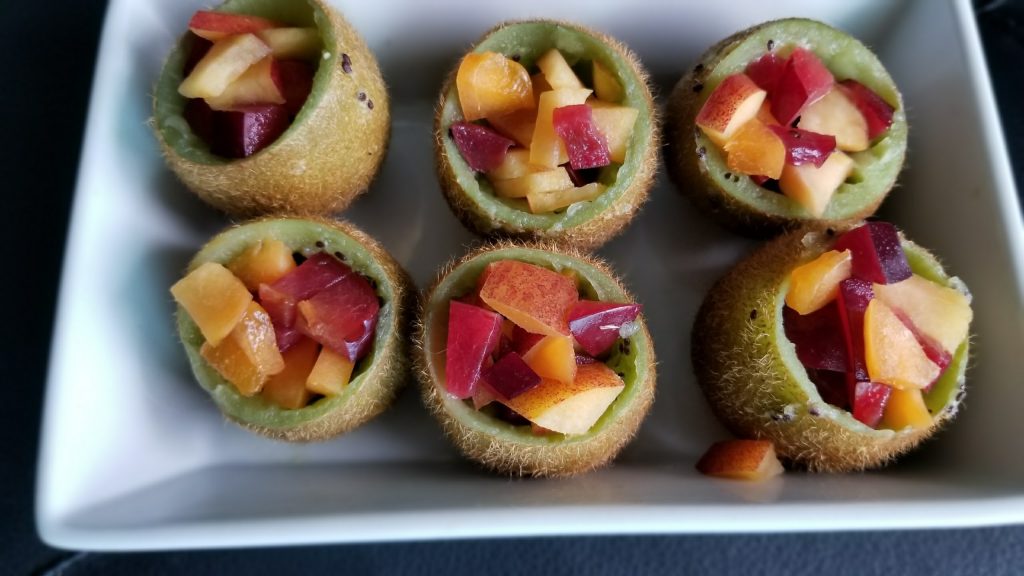
This fruit salad served in kiwi cups were also an idea I found on Pinterest.
Hope this blog post encourages you to host a brunch one day soon and hope everyone is enjoying their summer too!!


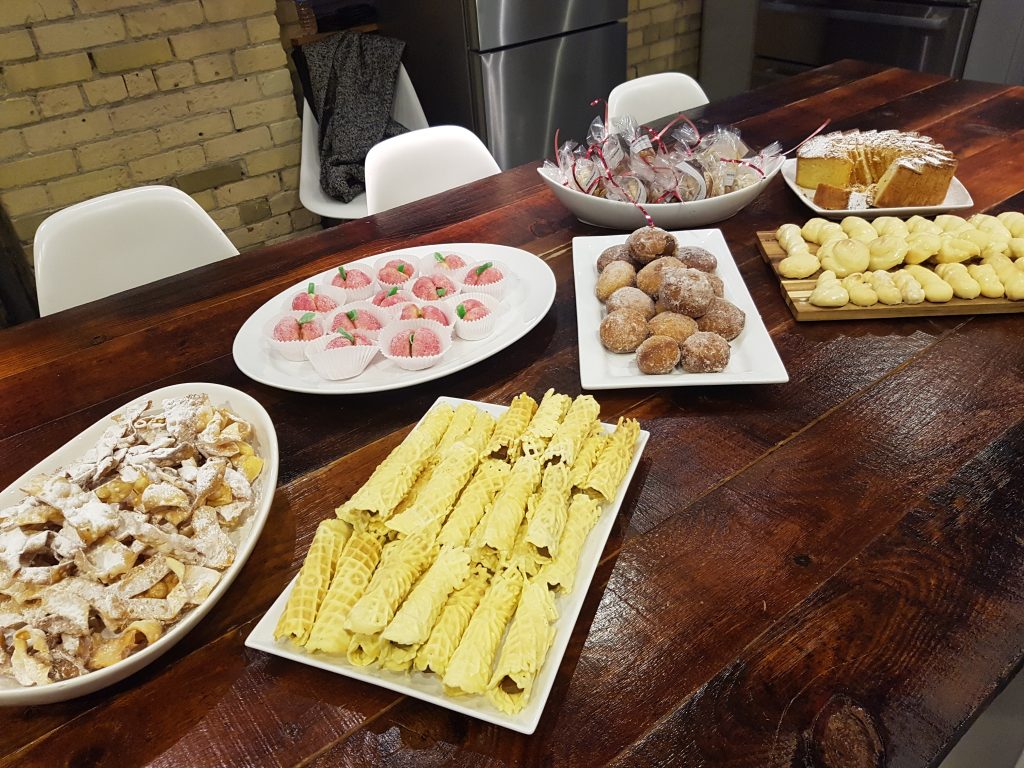
I hosted a dinner party on Saturday night and the menu looked liked this:
-Ginger Tomato Soup with Roasted Chickpea Croutons
-Zucchini Ribbon Salad with Feta Cheese and Nuts
-Roasted Za’atar Cauliflower with Dates, Pine Nuts and Thyme
-Sweet Potato Noodle Salad with Roasted Corn
-Winter Citrus Butter Salmon
All the recipes were found on Pinterest (does that surprise you?) plus it was the first time I had attempted to make these recipe. Pretty brave move, non? I also brought out my china that was purchased in 1990 but in storage for the last 5 years. I’m determined to start using it again every Friday night.

Needless to say, I would make each and every recipe again!
This blog post is going to be dedicated to one of the recipes that I made for the dinner party. PS a trip to Bulk Barn with help with you with most of the ingredients. Hope you appreciate that tip!!
RECIPE; Roasted Za’atar Cauliflower with Dates, Pine Nuts and Thyme (original recipe courtesy of www.downshiftology.com)
1 head cauliflower, cut into florets
3 tbsp olive oil
1 tbsp, za’atar spice *I used a few tablespoons.
salt and pepper, to taste
¼ cup pine nuts
1 tsp olive oil
6 Medjool dates, pitted and diced
1 tsp fresh thyme, plus extra sprigs for garnish
INSTRUCTIONS
1. Preheat the oven to 400 degrees fahrenheit.
2. Place the cauliflower florets on a baking sheet and drizzle with 3 tablespoons olive oil. Sprinkle with za’atar spice, salt and pepper and toss.
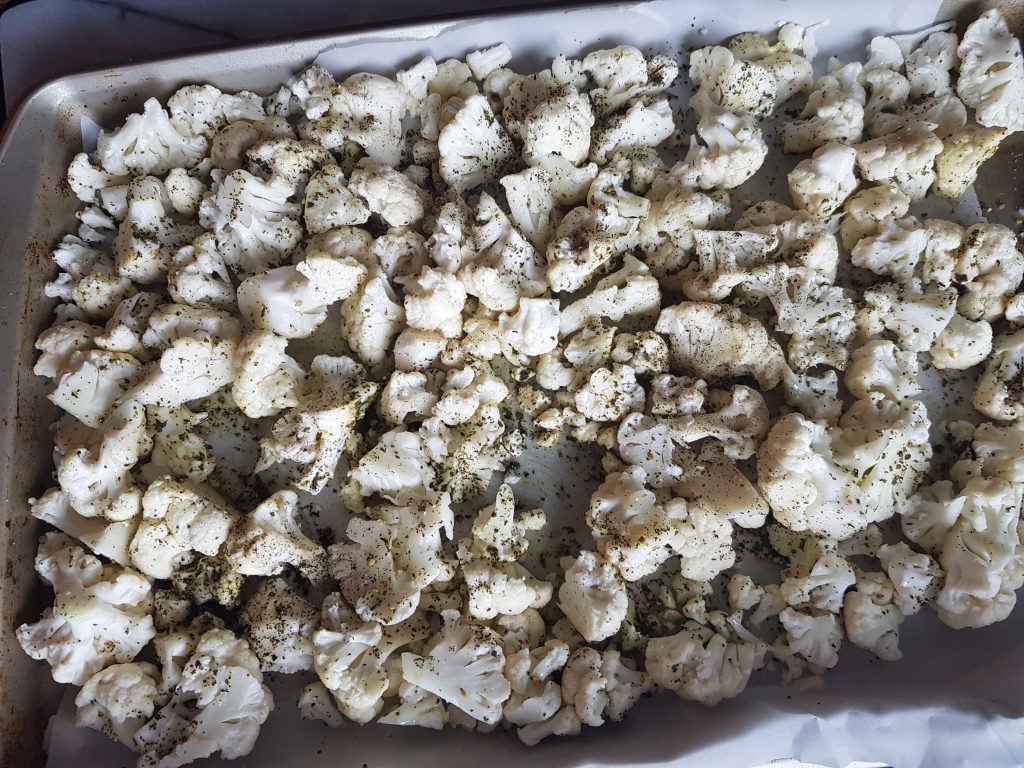
Cook in the oven for 20-25 minutes or until golden brown, and stirring halfway through.
3. While the cauliflower is cooking, heat a small pan on medium heat. Toast the pine nuts in a dry pan for 1-2 minutes, then add 1 tsp olive oil, the chopped dates and thyme. Cook for another minute or two.
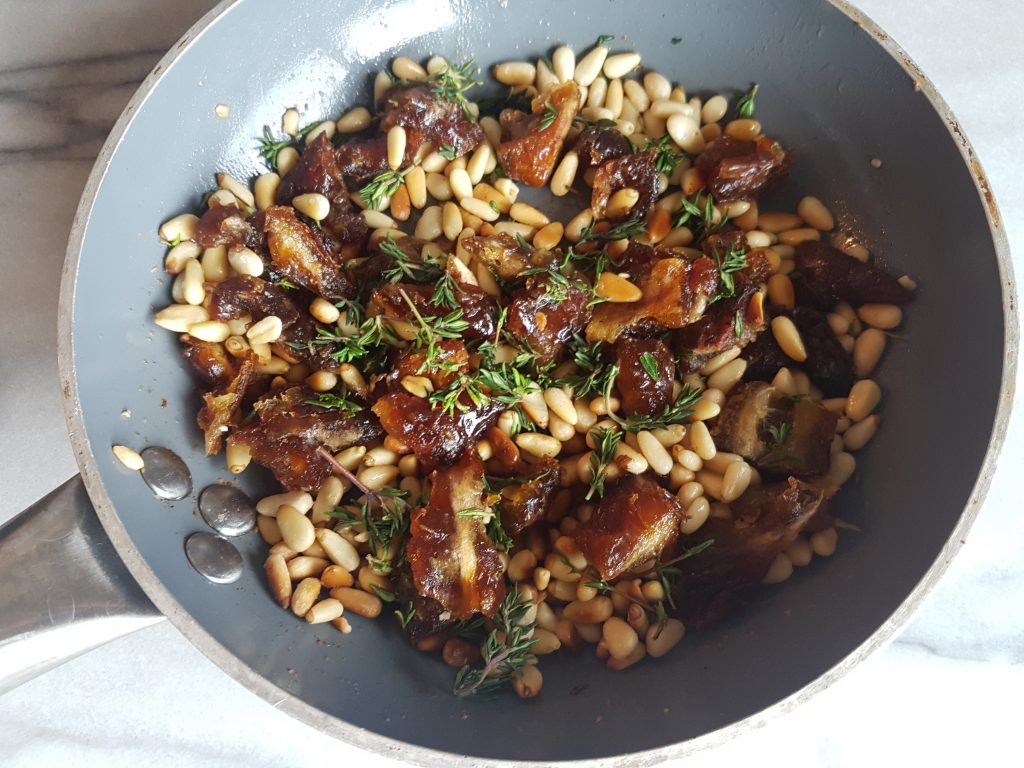
3. Mix the date/pine nut mixture with the cauliflower florets in a serving bowl.

Trust me, this dish tastes delicious and wasn’t hard to prepare at all.
PS more recipes from this dinner party will be on its way!!
Happy Cooking.
True Story: I grew up with margarine. There was NEVER butter in the house as we were Jewish and kept meat and dairy separate. Therefore it was easier just to use margarine.
However when I had my first apartment, I decided to have a dairy kitchen and ONLY to buy butter. I have baked exclusively with butter for the last three decades.
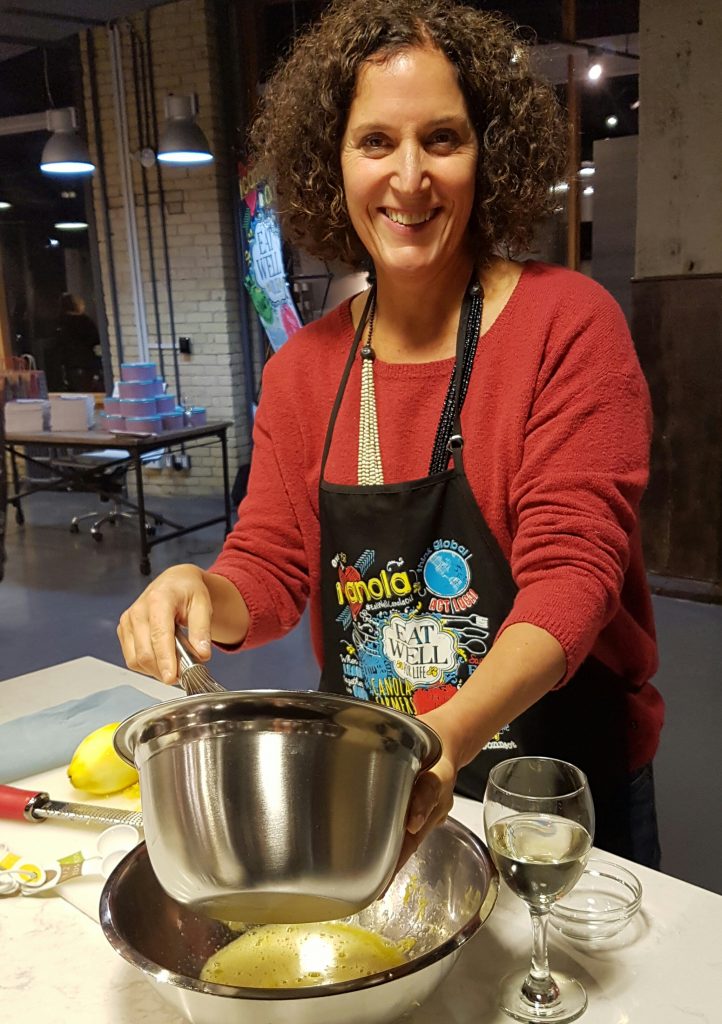
But the other night I was invited to a “Bake with Canola” event. Here’s proof that I was actually baking with Canola!
Here’s another true story: In my cupboard at the moment is Vegetable Oil and Olive Oil. No ideas why I have never considered buying Canola Oil. One could easily blame it on my mom – I have a good feeling she never bought Canola either!!
At the event, I learned a few reasons why I should be choosing Canola Oil.
- It tastes good: Canola has a neutral flavour that won’t take over. It actually absorbs the flavours of the herbs and spices thats’ in the recipe!
- It can “take” high heats: Canola oil has a really high heat tolerance which makes it ideal for frying.
- Canola is farmed right here in Canada. Here’s a cool fact: There’s over 43,000 Canola Farmers in the Prairies.
- It’s a healthy Choice: Canola Oil is a good source of Vitamin E and K, and is packed with Omega 3 fats. It also has the lowest amount of saturated fat.
The event took place at the Luxe Appliance Studio where we were divided into groups. Each group baked one item from this list.
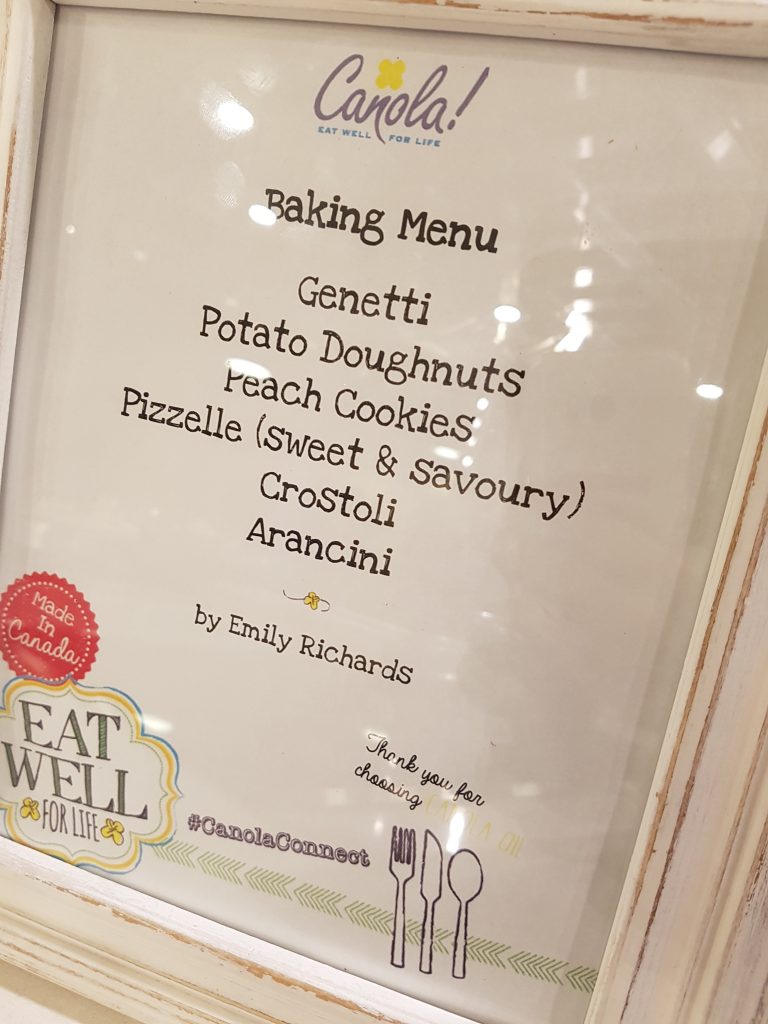
The evening was hosted by Emily Richards who is a professional home economist, cookbook author, recipe developer and someone who I have been following since she was on TV back in the early 1990’s. Plus the recipes we used were from her new cookbook called Per La Famiglia: Memories and Recipes of Southern Italian Cooking.
At the end of the evening, there was a beautiful dessert buffet all made with Canola Oil!!
I can’t wait to start baking and frying with Canola Oil. My pantry now has a 3rd oil to select from and I have a feeling that it will be used very soon. You see, next month I will be frying up some delicious latkes for Chanuka using Canola Oil!!
Fore more information:
Website: Www.CanolaEatWell.Com
Twitter/Instagram: @CanolaEatWell
Disclosure: This is a sponsored blog post however all my opinions are my own.
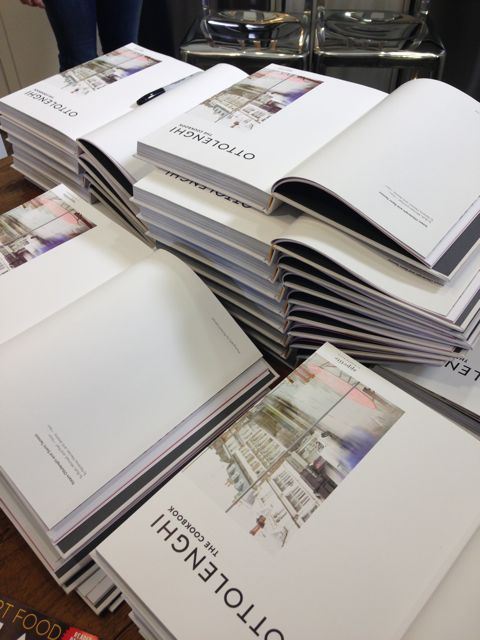
I had the opportunity the other day to visit the Chatelaine Kitchen and meet celebrated Chefs Yotam Ottolenghi and Sami Tamimi. I was familiar with these two chefs as many of my friends have their cookbook and I’ve often leafed thru it while chatting with them in their kitchens.
When I posted on facebook that I was at this event. ..there was a lot of very positive feedback. Clearly they have a HUGE following!!
The lovely Claire Tansey who is the Chatelaine Food Director, introduced both chefs and then asked them a few questions while they prepared a salad. (which I forgot to take a photo of..arghh).

Questions from the floor were also taken:
-What are some under used ingredients: They answered – Tehina, Maple Syrup, Rose Water and Sumac.
-Who would they like to cook for?: They answered – Nigella Lawson!!
I was thrilled to find out that all the guests would be receiving an autographed copy of their recently launched cookbook: Ottolenghi: The Cookbook!!
I’ve been flipping thru it and have spotted a few recipes I’m sure I will be trying in the near future. Specifically:
-Portobello Mushrooms with Pearled Barley and Preserved Lemons
-Danielle’s Sweet Potato Gratin
-Fennel Cherry Tomato and Crumble Gratin
This cookbook features 140 recipes with bold and flavorful ingredients. I’m sure I’m going to love it!!
Happy Cooking!!
If I tell a friend that “I’m having company over “…. this is code for “I’m going to try some new recipes”.
Here’s three new recipes that I will be trying.
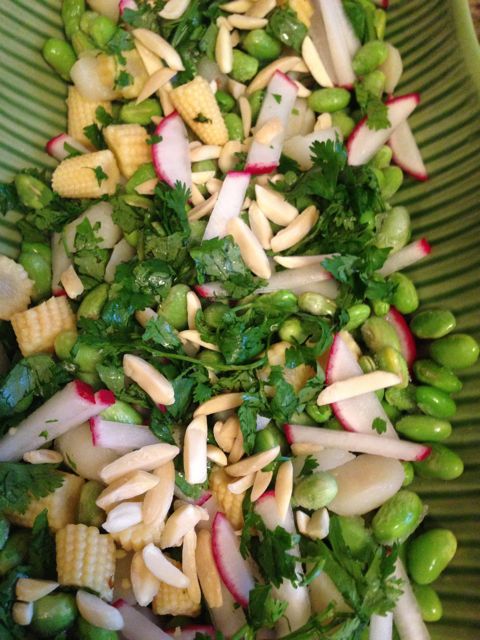
-Oriental Edamame Salad courtesy of AllRecipes
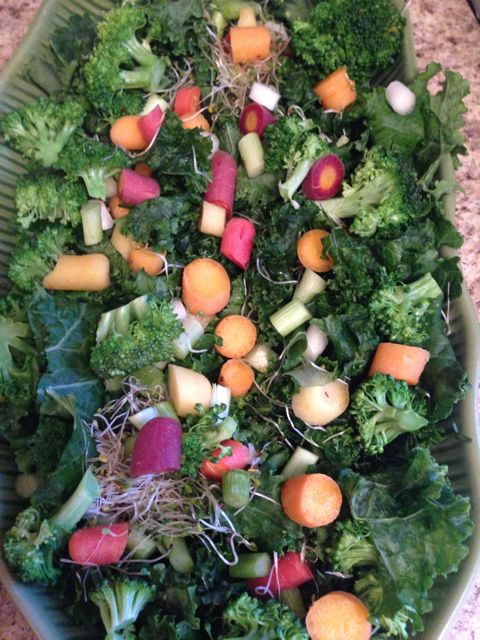
-Green Goddess Kale Salad courtesy of Daily Bites Blog
-The Ultimate Filet O Fish Sammie courtesy of Food Network.
The meal will also include fresh salsa, tortilla cheese, a cheese platter and a rhubarb strawberry crisp!
Can you tell that I spent some time on -line researching some recipes. I love it though!!
Todays blog will feature two salads that I’m going to be serving, K?
First Salad: Oriental Edamame Salad
Ingredients
- 2 tablespoons sesame oil
Directions
- Heat a small skillet over medium-low heat; cook almonds until lightly toasted and fragrant, 2 to 3 minutes.
- Whisk sesame oil, soy sauce, vinegar, sugar, garlic, and ginger together in a bowl for the dressing; season with salt and black pepper.
- Combine edamame, baby corn, water chestnuts, radishes, green onions, cilantro, and toasted almonds in a large bowl; toss with dressing until coated. Serve cold or at room temperature.
FINISHED SALAD
Second Salad: Green Goddess Kale Salad
5 cups chopped kale
2 cups finely chopped broccoli florets (I steamed them slightly)
3/4 cup thinly sliced scallions
1 medium carrot (I used multi colour baby carrots)
Handful of sprouts
Handful of pumpkin seeds
1/2 medium ripe avocado, pitted
1/2 cup unsweetened almond milk or regular milk
2 tablespoons fresh lemon juice
2 tablespoons maple syrup or honey
1 tablespoon apple cider vinegar
1 tablespoon extra-virgin olive oil
1 teaspoon Dijon mustard
Sea salt and pepper, to taste
Instructions
In a large bowl, combine the kale, broccoli, scallions, and carrot. Reserve the sprouts and pumpkin seeds for garnish.
Scoop the avocado flesh into a blender or food processor. Add the milk, lemon juice, maple syrup, vinegar, and mustard. Puree until smooth. The dressing will be thick, with the consistency of mayonnaise. Pour the dressing over the salad and toss to coat everything thoroughly. Season to taste with salt and pepper.
Garnish plates of the salad with the sprouts and pumpkin seeds.
FINISHED SALAD
 Happy Cooking!
For years and years, I did not go NEAR a recipe that involved phyllo dough. I was frozen with fear. I don’t know why but I wouldn’t touch the stuff. Then one day I saw a course being offered called “FEAR OF PHYLLO” and I quickly signed up.
During the class we learned how to make sweet potato purses, spinach/feta bourekas, streudel and more. I think it was one of the first cooking classes I ever went to and I loved the fact that it was hands on.
I STILL have the outline from this course (I am not a hoarder – I swear). But for some reason I make the same thing with phyllo – over and over again. I am addicted to making phyllo cups. I make them – freeze them – serve them.
Here’s the most important thing you need to know: when you are ready to start this recipe, please do not answer the phone, do not take out a load of laundry or start to empty the dishwasher …you must focus on the phyllo!! Otherwise it will dry up, crack, and you will be swearing at me!!
PHYLLO CUPS:
one package of phyllo dough (thawed)
1/2 cup melted butter
muffin pan, scissors, pastry bush
INSTRUCTIONS
1. brush one sheet of phyllo dough with melted butter

2. cover it with another sheet of phyllo dough and brush that sheet with melted butter as well
3. take yet another sheet of phyllo dough and brush that sheet with melted butter. (I used 4 sheets for a “thicker” phyllo cup)
4. take SCISSORS and cut the sheets into healthy sized squares

5. place the square into a muffin pan

6. bake in preheated 375 oven for 8 minutes. (till golden brown).
That’s it. How simple, wouldn’t you agree?
Then I take the phyllo cups and freeze in a tupperware container till I need them.

ready for the freezer!!
What do I do with these phyllo cups? Here’s some ideas:
-goat cheese with a roasted tomato
-roasted garlic
-ricotta with mint/honey
Curious to know if you use phyllo dough often and what you use phyllo dough for.
Note: I put the leftover phyllo dough into a zip loc bag and put it in the freezer.
I was tired of making tuna burgers and salmon burgers and was searching the internet (for a change) for a corn cake recipe. I’ve made corn fritters before but I can’t say they were much of a hit. The corn cake recipe, I found on the Betty Crocker website uses Bisquick, and I think this makes a huge difference. I’m thrilled with the results. Bye bye corn fritters – hello corn cakes!!
The recipe suggested serving the corn cakes with a sour cream chive dressing but I was in the mood for something spicy so I grabbed the Sriracha bottle I had in the fridge and it was perfect.
Also I noticed that perhaps I didn’t chop up my vegetables fine enough…which is SO typical of my “rush rush rush” style of cooking. Nevertheless – I was thrilled with the results.
MINI CORN CAKES
INGREDIENTS
- 1 tablespoon butter or margarine
- 1/3 cup chopped green onions (really really fine)
- 1/3 cup chopped celery (really really fine)
- 1/3 cup chopped red bell pepper (really really fine)
- 1 cup soft white bread crumbs (I used panko bread crumbs- I figured “why not”)
- 1/2 cup Original Bisquick® mix
- 1 tteaspoon sugar
- 1/2 teaspoon salt
- 1/8 teaspoon ground red pepper (cayenne)
- 2 eggs, slightly beaten
- 1 can (11 oz) whole kernel corn, drained
- 2 tablespoons vegetable oil
- TOPPING
- 1/2 cup chive-and-onion sour cream

will chop the veggies a little smaller next time

This recipe couldnt be easier

Will be making these again.
Hope you like this recipe as much as I did. I think it would be a great side dish along with a piece of salmon and roasted root vegetables. What do you think?
Happy Cooking.
Disclosure: I am part of the Life Made Delicious Blogger program and I receive special perks as part of my affiliation with this group. The opinions on this blog are my own.

too many to count!!
I’ve confessed to having an obsession with paper napkins/plates in a previous post. But I have another confession to make.
I have a Ziploc container obsession too.
It all started when I was pregnant (many many years ago). I knew that I wouldnt have time to cook once I had a baby, so I spent a lot of time FREEZING.
You name it – I froze it: Lasagna, Chili, Soups, Stuffed Pasta Shells, Kasha and Bowties, Crisps, apple sauce, rice, banana muffins, cookies and more.
Years later – I continue to freeze. It’s become almost a habit. I can’t seem to make a single batch of ANYTHING.
Ziploc containers have saved me!! I love them. I honestly dont know what I use to do before they existed. Oh yeah – I stored soup in Ziploc bags!!
My “Ziploc” drawer is a bit overboard – but hey – I never run out!! As you can see from the photo I’m a bit behind these days. However when I logged onto Life Made Delicious, I entered the word “freeze” and 128 recipe ideas came up with tips at the bottom of each recipe if I want to freeze the recipe. I love it!!
Must stop blogging now and start freezing!!
Disclosure: I am part of the Life Made Delicious Connector Program and I receive special perks as part of the affiliation with this group. The opinion on this blog are my own.

Best Ever Banana Muffin
The weather is finally getting cooler which means that I am back in the kitchen baking. If I had to pick three favorite items I like to bake – they would be: a) banana muffins c) chocolate chip cookies and c) fruit crisps.
Basically I like to make anything that can freeze!!
This particular blog entry will be dedicated to the Best Ever Banana Muffins!! Naturally this recipe is from the Toronto Star, (Sept 3, 20008) and is Star Tested. Just so you know, I’ve been a fan of the Toronto Star Wednesday Food Section for as long as I can remember.
Ingredients:
2 cups of mashed bananas (about 5) ps the darker the better
3/4 cup granulated sugar
1 egg
1/3 cup melted butter
1 tsp baking soda
1 tsp baking powder
1/4 tsp salt
1 1/2 cups all purpose flour
Method:
In a large bowl, mash bananas. (I use the mix master for this part – kinda like them really really mushy).
Sir in sugar and egg.
Add melted butter.
Stir in baking soda, baking powder, salt and flour to make a thick batter.
Fill each cup of a 12 cup muffin tin about 3/4 full. Bake in a 375 degree oven for 20 minutes.
THESE MUFFINS FREEZE BEAUTIFULLY.
**If you want you can also add 1 cup of chocolate chips to the batter.
Happy Baking.
Nothing like baking with THREE (thats right THREE ingredients). I took one glance at the recipe and said to myself “I am SO trying this recipe” and I did. Naturally I had the sugar and the Bisquick, but for some reason I only had ONE beer in my house and it was a flavored beer. Oh well!!
The recipe by the way came from www.cooks.com
Here’s what you need:

1 bottle of beer (12 oz or 1 1/2 cups)
4 1/2 cups of Bisquick
3/4 cup sugar
Blend all ingredients in a bowl (wow – no mixer necessary – I love it).

no mixer necessary - just a fork and a bowl
Preheat oven to 375 degrees. Fill greased muffin pans with enough mixture to fill 2/3 of each muffin container.
Bake 20 to 30 minutes or till the top is slightly brown.
END RESULT:

Were they good? Here’s the answer…I ate one, then I ate another one. Yup – it was good!!
Note: Curious to make them again using a regular beer. Will keep you posted.
Disclosure: I am part of the Life Made Delicious Connector Program and I receive special perks as part of the affiliation with this group. The opinion on this blog are my own.