Posts Tagged ‘Dessert’

Dec
04

Need a Dessert?


I’m a big fan of making individual desserts. I truly believe if you serve a big cake to your guests everyone will say “I will pass”. But if you present them with their own dessert on a plate – they will accept it. Do you agree?

The dessert I served at a dinner party this past week was indeed “blog worthy” so here it is.

APPLE PIE BAKED APPLES (original recipe from Sally’s Baking Addiction can be found here)

Ingredients:

1/2 recipe homemade pie crust (ok I cheated and bought ready made pie crust)
1 teaspoon cornstarch
1 Tablespoon  warm water
8 firm apples  (Granny Smith, Honey Crisp, Gala) – 2 apples will be used for the apple filling)
1 teaspoon cinnamon
1/2 cup granulated sugar
1 teaspoon vanilla extract
1 large egg
1 teaspoon milk
homemade salted caramel sauce, for drizzling (optional)

Directions

Prepare the pie crust, including allowing it to chill for at least 2 hours. Or if you are short of time (story of my life) – take the pie crust out of the box and cut it into 1/4 inch wide strips.

Make the apple filling: In a very small bowl, mix the cornstarch and warm water together until smooth, creamy, and the cornstarch has disolved. Set aside. Peel and dice 1 apple. In a medium saucepan over medium heat, cook the apple pieces, cornstarch/water mixture, cinnamon, and sugar. Stir constantly for 5 minutes. Switch to low heat and allow to simmer for 5 minutes. Remove from heat, stir in the vanilla, and allow to cool off for 20 minutes.

apple-filling

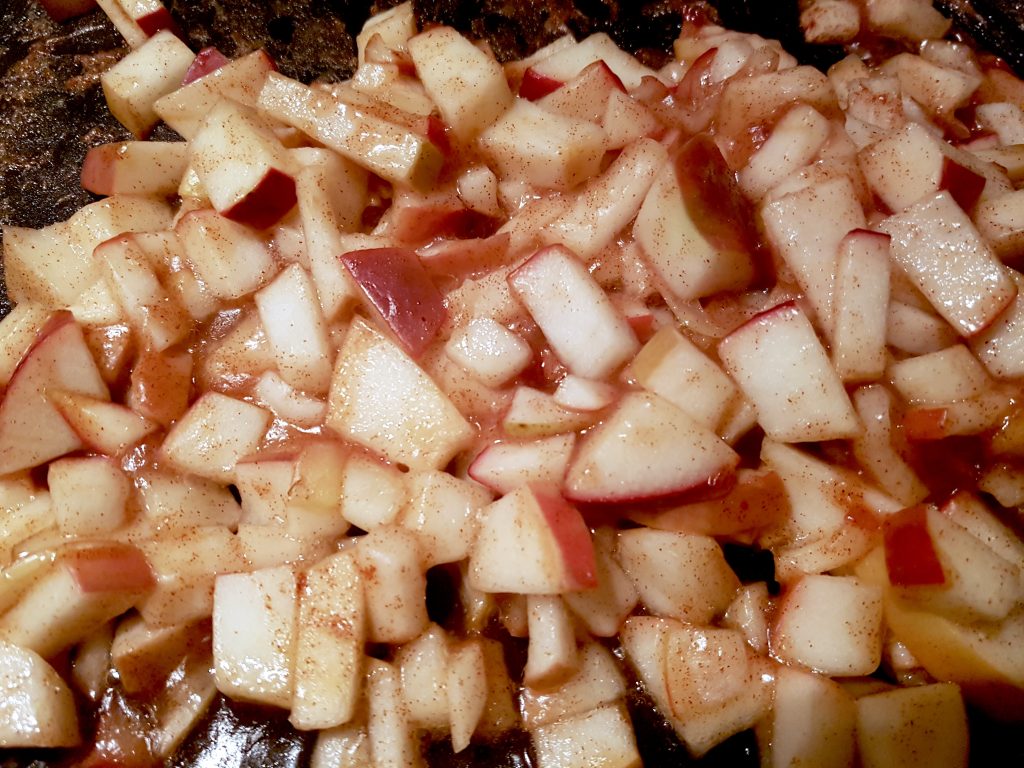
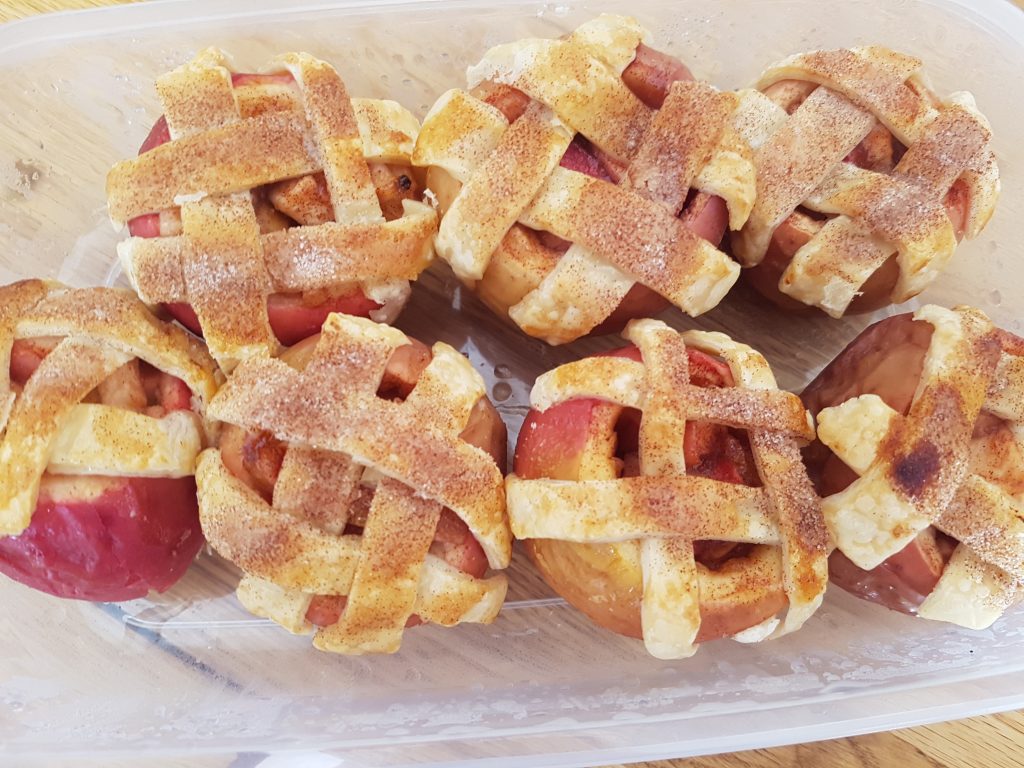
TWO APPLES GO A LONG WAY!

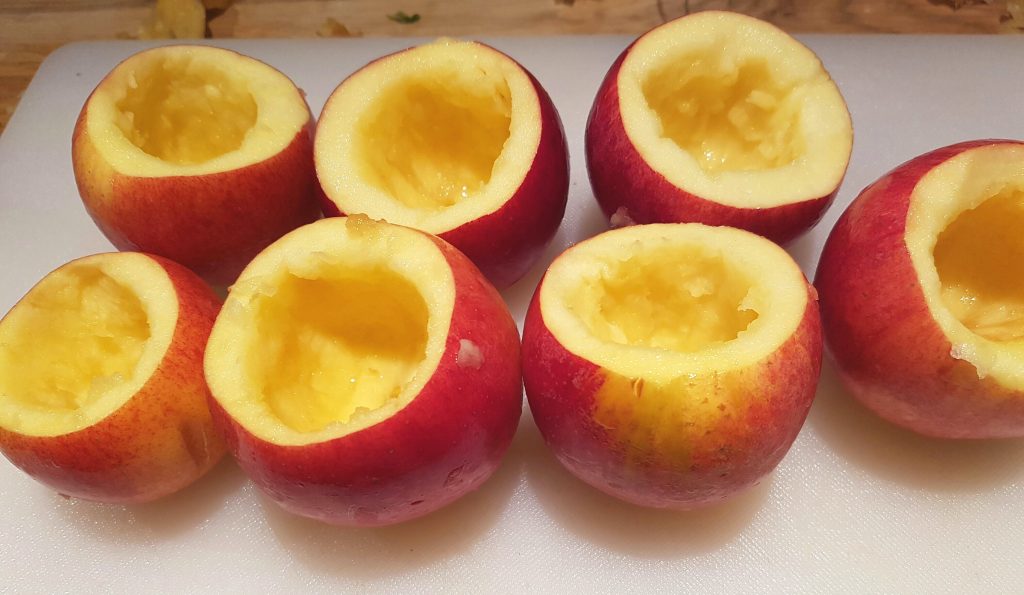
Assemble: Slice off the tops of the 4 remaining apples. Using a spoon (or melon baller), dig out the core. This takes some effort but its worth it.

apples-core

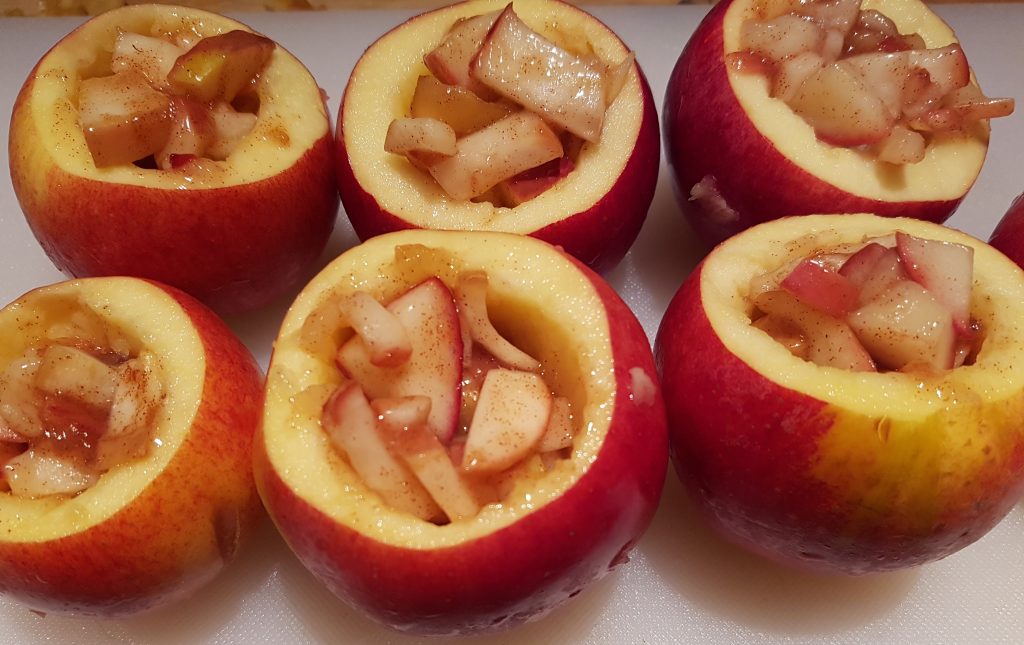
Spoon the prepared apple filling into the cored-out apples.

apples-fill

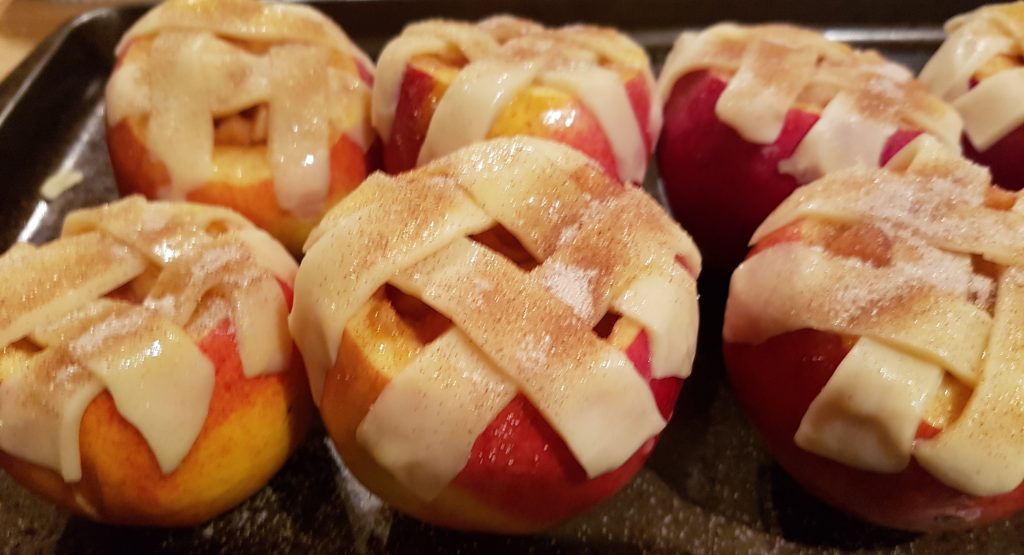
Lay 3-4 strips of the pie dough on top of the apple. Then, working with one new strip at a time, alternate weaving it over and under the dough strips already in place. Repeat until the top of the apple has been covered in this lattice style crust. Using a sharp paring knife, trim excess pie crust around the edges. Repeat with remaining apples and pie dough strips.

apple-before-oven

Bake:
Place apples into an 8-inch or 9-inch square baking pan or pie dish– really any size baking pan works. In a small dish, whisk the egg and milk together. Lightly brush the tops with egg wash. I sprinkled a little bit of cinnamon on top of the egg wash before going into the oven.  Bake for 25-30 minutes in a 375 degree oven or until the crust is browned and the filling is bubbly.
If desired, drizzle each with salted caramel. Serve with ice cream!!

FINAL PRODUCT:

apples-final

Happy Baking!!

Share this:
Share this page via Email Share this page via Stumble Upon Share this page via Digg this Share this page via Facebook Share this page via Twitter

, , , ,

Feb
09


I adore mini desserts these days and my guests appreciate them too.

I also love combining chocolate with fruit!!

So when I was introduced to Second Cup Coffee Co.’s New Hot Chocolate Cookie, all I could think of is how divine it would be to incorporate this cookie into a particular dessert that I’ve made before.

second cup - strawberry:cookie

The previous dessert called for “graham cracker crumbs” and to be honest, it’s not something I have in my pantry all the time. (er…never). However I know that every day I pass a Second Cup and can easily pick up their new Hot Chocolate Cookie.

I won’t keep you waiting for the recipe much longer. Here you go!

STUFFED STRAWBERY CHEESECAKES BITES

Ingredients:

12 strawberries

1/3 cup of soft cream cheese ( a little goes a long way)

1 tsp of vanilla

1/2 of a Second Cup Coffee Co’s Hot Chocolate Cookie

Instructions:

1. Using a sharp knife, dig a cavity into the top of the strawberry

2. Using the same knife, also take the bottom off so the strawberry stands up nice and pretty

3. Mix the cream cheese and vanilla with a fork

4. Break up half of a Second Cup Coffee Co’s Hot Chocolate Cookie (feel free to just eat the remaining half.  Yum!)

second cup - crumbs

4. Carefully spoon the cream cheese mixture into the cavity of the strawberry.

5. Sprinkle the top of the strawberries with the crushed up pieces of the Hot Chocolate Cookie!

6. Serve or refrigerate till ready to serve.

FINAL RESULT

second cup - final dessert

I hope you get a chance to head to Second Cup and try this Hot Chocolate Cookie one day soon. You won’t be disappointed.

Second Cup Hot Chocolate Cookie

Second Cup Coffee Co. Logo


Second Cup is super interested to know what you think of their new favourite cookie, so Taste It and Rate It for a chance to WIN 1 of 5 $50 Second Cup gift cards! Click on their Facebook page to learn more about #TasteItandRateIt

But before I finish this blog post I want share with you details about a FREE skating event that Second Cup is hosting, with the help of one of this country’s iconic figure skaters, Elvis Stojko. The skating party will take place on Saturday Feb 20th and begins at 10:00 a.m. at Harbourfront Centre’s Natrel Rink and will feature free skate rentals*, free on-site skating lessons for beginners**, FREE Second Cup Coffee Co. Hot Chocolate* and FREE samples of the new, delicious Second Cup Coffee Co. Hot Chocolate Cookie*.

Please click here to find out more details about this fun event.

P.S. Everyone is welcome!!

For more information:

Website: www.secondcup.com

Twitter and Instagram: @secondcupcanda

Facebook: https://www.facebook.com/SecondCup/

Hashtag: #TasteItRateIt or #SCCookie

Disclosure: I’ve been compensated for this blog post however all opinions are my own.


Share this:
Share this page via Email Share this page via Stumble Upon Share this page via Digg this Share this page via Facebook Share this page via Twitter

, , , , , , , , ,

Feb
05


True story:

I was online searching for a new dessert recipe to try and came across a recipe called:  “Lemon Magic Cake”.

I got all excited and starting grabbing the ingredients out of my fridge and pantry.

BUT I  then realized:

-I didn’t have any lemons

-I couldn’ find my whisk attachment for the KitchenAid

-I didn’t read the recipe properly and kept the egg whites but threw out the yolks when I actually needed the egg yolks

-the recipe required an 8×8 pan and I didn’t own one. (can you believe this?)

TOTAL FAIL. REPEAT…. TOTAL FAIL

I was so determined to make something new and returned to the internet in search of a new recipe to try. I came across a recipe for Date Squares which for some reason I’ve never made before.  I checked to see if I had ALL the ingredients and indeed I had everything. (sigh of relief). I even ran out to the dollar store to buy an 8×8 pan.

In no time at all, I made a delicious desert. Trust me, I will make it again.

Here’s the recipe for Date Squares (taken from www.JoCooks.com)

For Filling
3 cups dates, pitted
1 cup water
1 tsp vanilla extract

For Crust
2 cups old fashioned rolled oats
1 cup all-purpose flour
¾ cup brown sugar
½ tsp baking soda
¼ tsp salt
⅛ tsp cinnamon
1 cup cold butter, cut into small cubes

INSTRUCTIONS
Preheat oven to 350 F degrees. Line a 9 inch baking pan with parchment paper. Set aside.

1. In a medium saucepan add the water and the dates and cook over medium heat for about 10 minutes, until there’s no water left. Add the vanilla extract to the dates and mix well. Let mixture cool.

2. Add the date mixture to a food processor and pulse until it turns into a paste. Set aside.

3. In a food processor add the remaining dry ingredients and the butter cut into small pieces and pulse until the butter is well incorporated into the mixture and crumbles.

4. Spread ⅔ of the crumb mixture on the bottom of the prepared baking pan and spread it evenly.

5.  Add the date mixture and spread it with a spatula. Add the remaining crumb mixture as the last layer and pat it using a spatula, do not press down too hard.

6. Bake for 35 to 45 minutes until golden brown then let cool completely. Place in the fridge for a couple more hours then take it out and cut into squares.

FINAL PRODUCT.

date square - finalHappy Baking!

Share this:
Share this page via Email Share this page via Stumble Upon Share this page via Digg this Share this page via Facebook Share this page via Twitter

, , , , , , , ,

Jul
19


It’s summer and the last thing I want to do is be in the kitchen. I don’t know about you but I cook a lot more in the winter.

Here’s a few things to make that will take no time at all so that you can spend more time enjoying the sunshine.

a) An appetizer with two ingredients: Piggies in a Blanket.

Not sure why I’ve never made these before. They are simple to make and simply delicious.

All you need is hot dogs (or Yves Veggie Dogs) and Pillsbury Croissant Dough.

2 ingredients - dough

Directions: Open up the tube of Pillsbury Croissant Dough. Cut into smaller strips. Wrap around a cut up hot dog. Bake for 25 minutes in a 350 degree oven. Could it get any simpler than this?

2 ingredients - piggies

b) Two ingredient dessert: Strawberry Galette. (sorry no photo)

Directions: Take any berry and boil it with a touch of sugar and a touch of water. Then take some PC butter pastry and put the berries in the middle and then fold it. Bingo – you’ve got yourself dessert.

c) Four ingredient desert: Ice Cream Cake

You will need; No Name Ice Cream Sandwiches, No Name Icing, a few cherries and a few PC chocolate chips.

dessert  - ice cream

Instructions: Place 4 ice cream sandwiches next to each other. Take the icing and spread it on top. (I’ve used the PC ice cream syrup for this and it worked as well). Basically you need something to act as “the glue”. LOL. Then take 4 more ice cream sandwiches and place it on top. Final step: more icing (or syrup) on top and then decorate with cherries and chocolate chips!! THIS DESSERT IS A WINNER. dessert - finalI love entertaining (as you know) and I love discovering recipes that are easy to make as well.

Do share your easy recipes with me!!

Share this:
Share this page via Email Share this page via Stumble Upon Share this page via Digg this Share this page via Facebook Share this page via Twitter

, , , , , , , , ,

Feb
26


It’s not everyday that I receive an invite to attend a dinner party at the home of Jessica and Ben Mulroney. Of course, I replied…COUNT ME IN.

Naturally, they were super friendly and wonderful hosts!

danette - jessica

The incredible food that was served, was prepared by Cafe Bar Pasta. (1588 Dundas St. W). Great choice Ben and Jessica!!

danette - meal

Even the table was spectacular. Notice the creative place cards? Love it.

danette - table

Dessert was really the main “event”. You see, Danette from Danone was recently launched in Canada. Made from 75% Canadian milk, Danette is also a source of calcium, making it the perfect nutritious dessert.

danette - dessert2


A study from Danone Canada shows that nearly 2 out of 3 Canadians say they feel a desire to treat themselves after a meal. I’m one of those people!! Now I can indulge as it comes in 6 delciious flavours: Chocolate, Caramel, Choco-Coconut, Vanilla and Coffee.
Yes..I tried all of them. (of course).

Danette is a simple and enjoyable way to add more dairy into your diet.
Cheers to that!!

For more information:
Website: http://www.danone.ca/en/products/danette
Hashtag: #danettefordessert

Share this:
Share this page via Email Share this page via Stumble Upon Share this page via Digg this Share this page via Facebook Share this page via Twitter

, , , , , ,

Oct
30


I discovered Pukka via Twitter (does that surprise you?) and then found out that they  recently opened up a little over a week ago on St. Clair Ave. West.  I was eager to blog about Pukka seeing as I haven’t reviewed an Indian restaurant ever!!

Let’s start off with the space:

Not too dark. Not too bright. Plus I love the colour combos. It’s a pretty cool space for a restaurant in “North Toronto”. (in my humble opinion)

pukka - space

Now let’s talk about the food. Pukka has managed to make Indian food – INTERESTING. It’s not heavy, or greasy or boring at ALL.

Here’s four dishes that really were outstanding. They were interesting, fresh, extremely flavourful and light.

Top Left: Vegetable String Chaat – puffed rice, sprouts, chutneys and sweet yogurt

Top Right: Baby Kale Salad – dates, lotus chiops and spiced cashew dressing. See what I mean?

Bottom Right: Wilted Winter Greens – pickling spices.

Bottom Left: Tandoor Roasted Paneer – sweet peppers and pineapple

pukka - 4 dishes

The meal continued with a few other winners:

Top Right: Chicken 65 – South Indian Fried Chicken (this is a MUST to order – and I’m not even a huge fan of chicken!!)

Bottom Right: Butter Chicken – tomato butter sauce.

On the Right: Vegetable Pakoras with Tomato Chutney

pukka - 3 photosBelieve it or not,…we managed to try dessert despite the fact that we were full.

Left: Eton Mess – rosewater meringue (my favorite), mango, pomegranate and sweet lassi cream

Right: Chai Pot Creme- candied pistachios, orange blossom creme anglaise, spiced shortbread (I loved the shortbread…hope they sell it separately one day)

pukka - dessert

Someone knows what they are doing in the kitchen and every dish was executed perfectly. I was super impressed with the flavours, textures, and presentation of each dish.

I have no doubt that the neighborhood is going to embrace Pukka. (which is pronounced PUCK – A).

For more information:

Pukka: 778 St. Clair Ave. West (West of Bathurst). 416 342 1906. They open everyday at 5 pm.

www.pukka.ca

Twitter: @pukkatoronto

Disclosure: Pukka is currently a client but I assure you that all opinions expressed in this blog post are my own.

Share this:
Share this page via Email Share this page via Stumble Upon Share this page via Digg this Share this page via Facebook Share this page via Twitter

, , , , , , , , ,

Feb
01


I grew up with three desserts: icebox cake, the “green dessert” and a lemon poppyseed cake that was made in a bundt pan. If any of my relatives are reading this, they can tell me if I’ve made a mistake!!

This blog post will discuss two of out the three desserts! The first one is truly a favorite. It has only TWO ingredients where as the the second dessert has THREE ingredients. Clearly my mom believed in K.I.S. (Keep it Simple).

ICE BOX CAKE

Whip up a container of  whipped cream:

Step One: Whipped Cream

2. Assemble cookies in a row and then shmeer the whipped cream in between the cookies: Place the finished product in the fridge for a few hours, before serving.

Step 2: I felt like a brick layer but with whipped cream instead of cement!!

FINAL PRODUCT:

Absolutely. Delicious.

SECOND DESSERT: THE GREEN DESSERT

You need three ingredients: food coloring, the same black wafer cookies, and Shirriff Lemon Pie Filling and Dessert Mix

1. Make the lemon curd according to the directions on the back of the box (basically add water to the powdered mix and stir over medium heat)

2. Add green coloring:

love this colour

3. ADD EGG WHITES (I forgot this step but it’s on the back of the box) but its important.

4. ASSEMBLE.

FINAL PRODUCT

Thanks Mom!! I had a great childhood with some great memories of amazing desserts!!

Share this:
Share this page via Email Share this page via Stumble Upon Share this page via Digg this Share this page via Facebook Share this page via Twitter

, , , , ,

Mar
20


Usually I enjoy making soup, but with these types of temperatures…. soup is NOT on my mind. Instead, I was inspired to make frozen yogurt as a result of this tweet I saw on twitter:

@FamilyBites: I am totally making this tomorrow! RT @dinnerwithjulie: Liberté Lemon Fro-Yo y’all. http://t.co/4rqy1SSv

I clicked on the link and said to myself “I MUST TRY THIS. STAT”….so I did. (this doesnt suprise you does it?).

As you know, I bought a Cuisinart ice cream maker/frozen yogurt machine last year. It was in “hibernation mode” over the last 6 months so it was time to bring it out. Plus, I was having guests for dinner and thought this would make the perfect dessert.

I followed these smple instructions:

a) bought Liberte yoghurt  (that’s a step, right?)

Step One: Go to the Grocery Store!!

b) put the entire container into the Cuisinart ice cream/frozen yogurt machine.

Let the Frozen Yoghurt Machine do its magic!!

c) flicked the button on. (oh what effort) and waited 10 minutes while it did it’s magic

d) served it to my guests!!

How simple! How healthy! How Perfect.

Summer is going to be great AND summer is going to be TASTY too.

One final note: I am now very curious to compare different brands of yogurts and different flavors as well. Stay tuned for a report.


Share this:
Share this page via Email Share this page via Stumble Upon Share this page via Digg this Share this page via Facebook Share this page via Twitter

, , ,

Jan
17


I was having company over and wanted to make something different for dessert. Something I have never tried before. Within no time at all, I was googling recipes for Lemon Meringue Pie.

I looked at several recipes/blogs before deciding that I was going to use the recipe from the blog: Sweet as Sugar Cookies, which she found from Cookie Madness.

It seemed easy:

  1. Make a pie crust
  2. Make the lemon filling
  3. Make the egg whites

Lemon Meringue Pie

Pie Crust:

Most of the recipes said “prepared pie crust”. Naturally I wanted to make my own.

I used a recipe from  Suite 101 written by Donna Diegel.  Click for the recipe and her useful tips.

Egg Whites: ( recipe taken from Betty Crocker)

3 egg whites

1/4 tsp cream of tartar

6 tablespoons of sugar

1/2 tsp vanilla

METHOD:

Beat egg whites on high with an electric mixer till foamy. Beat in sugar , 1 tablespoon at a time. Continue beating till eggs are stiff and glossy. Beat in the vanilla.

LEMON FILING:

Ingredients:

1 1/4 cup sugar

1/8 tsp sgar

1/2 cup cold water

1 tablespoon lemon zest

1/2 cup lemon juice

4 egg yolks

1 tablespoon butter (at room temperature)

1 1/2 cup boiling water

METHOD

Combine sugar, cornstarch, salt in a saucepan.

Whisk in 1/2 cup cold water, lemon zest and lemon juice. Blend thoroughly. Add the butter and whisk in 1 1/2 cups boiling water.

Set pan over medium heat and stir until mixture boils (about 7 minutes). Reduce heat and stir one more minute. Pour hot filling into pie crust, and top with meringue. Spread to the edges of the pie crust to create a seal and prevent shrinkage.

Bake in a preheated oven that at 350 degrees for 15-20 minutes and cool for two hours.

DO NOT (repeat – DO NOT) cover or it will WEEP. (I learned my lesson).

Making Lemon Meringue Pie,  was easy and not so easy! (does that make sense?). Did I make the pie crust too tough? did the lemon filling thicken enough? did the egg whites get stiff? I was a wreck.

However as each step was accomplished I was PROUD.

WOW – I just made the pie crust!

Wow – I just made the filling

WOW – I just made eggwhites!

Best part – wow – I DID IT. I DID IT.

I have to admit, that my stomach was in a knot for the full hour that I was preparing this recipe. I’m just not use to making crust, filling, and meringues. But it was worth it and I know that the next time I make this recipe it will get easier.

I finally served the pie and everyone enjoyed it but received some feedback that the pie crust was too tough. Good to know.

I would love to go to a pie crust 101 class!! Anyone else want to join me?

Disclosure: I am part of the Life Made Delicious Connector Program and I receive special perks as part of the affiliation with this group. The opinions on this blog are my own.

Share this:
Share this page via Email Share this page via Stumble Upon Share this page via Digg this Share this page via Facebook Share this page via Twitter

, , , , , , ,

Dec
18


There are occasions where I enjoy complicated recipes but there’s occasions when I enjoy recipes that are REALLY REALLY easy as well. Everyone has those “moments” in the kitchen – when they are tired from standing, tired from chopping and just want to make something that is EASY…. as in FAST and  WITH TWO INGREDIENTS. The fact that this recipe involves chocolate means that it is sure to be demolished. I mean, seriously, do you know anyone who doesn’t like chocolate?

Recipe #1: CHOCOLATE CHEWS:

INGREDIENTS:

1 package of Hershey’s chocolate chipits

1 package of crispy chinese noodles

METHOD

1. Melt chocolate

2. Mix in noodles

3. Take a tablespoon of the mixture and drop onto a lined baking sheet

4. Refrigerate for 15-20 minutes

RECIPE #2: CHOCOLATE/CANDYCANE BARK

INGREDIENTS:

1 package of Hershey’s Chipits

1 package of candy canes

METHOD

1. Melt the chipits

2. Unwrap each candy cane (this is the NOT SO FUN part), place in a zip loc bag and crush with a rolling pin (this is the fun part)

3. Mix the crushed candy cane with the melted chocolate

4. Spread  on to a lined baking sheet, to the desired thickness.

5. Refrigerate 15-20 minutes

Can't stop eating this!! Me. Bad.

Bonus: Both these desserts, freeze beautifully. So don’t hesitate to store them in a ziploc container for those ’emergency” moments when you need something last minute.

Share this:
Share this page via Email Share this page via Stumble Upon Share this page via Digg this Share this page via Facebook Share this page via Twitter

, , , , ,